
Installing Network Options
The Internet is built on a networking protocol called TCP/IP. In order to connect and use TCP/IP you must also be sure that this option is installed in Windows 95.
In order to install/check what networking options you have installed, you should click the "Start" button, then select "Settings", and then click on "Control Panel".
After getting to the "Control Panel", you now need to select "Network" to view/configure your network protocols.
Typically your screen will probably look something like the one below to start with. Notice that the "Dial-Up Adapter" we installed in the previous screen is installed here along with "Client for Microsoft Networks" and two protocols.

TCP/IP is not one of our listed Protocols, so we need to install it. In order to do this, we should click on the "Add" button. We will then be required to select a network component type. We should click on "Protocol" and then click on "Add" because we want to add the TCP/IP Protocol.

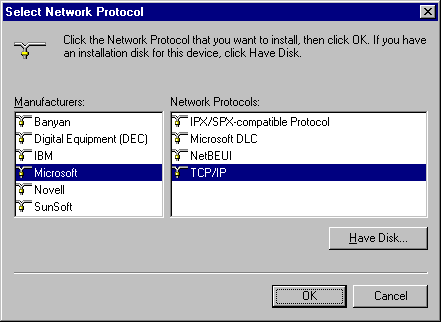
In order to add the TCP/IP Protocol, we should select "Microsoft" as the manufacturer and then select TCP/IP as the Network Protocol. After highlighting these two options you can click on "OK" and once again the software will be installed either from CD-Rom or diskettes depending on how Windows 95 was installed on your computer.
After the TCP/IP Protocol is installed, you can remove the "IPX/SPX-compatible Protocol" as well as the "NetBEUI" protocol since they are not needed. To do this, you should highlight the protocol you wish to remove and then click on the "Remove" button.

Once you have finished, you should have a Network screen which looks like the one below.

|
|
|
|